Showing posts with label Haneda Airport. Show all posts

Tuesday, June 11, 2013

Travel Blog: Japan Trip Itinerary Planning and Preparations, 日本之旅准备过程

I have decided to include this post because it takes a tremendous amount of time to plan and prepare for a free-and-easy trip, and precisely why it takes so long is because of how readily available the information is, especially for a country like Japan, where they have done an exceptional job of marketing themselves. So much information is available online that it's really good to know what you're gonna get, before plunging straight into the trip and then realizing that you could have had more information at hand to prevent certain unexpected things from happening. Also, we had spent about one month's time to gather information, book all the necessary accommodation, air tickets, planning, which trains and routes to take throughout our 8 days in Japan. Therefore I felt that we should share our experiences which could potentially help other travelers have an easier time planning a trip to Japan.

Air Tickets

This is more for Singaporeans. We got our tickets from Chan Brothers Travel, which had a promotion for the non-stop return tickets to Japan with Singapore Airlines Airbus 330-300. It was $370 for the tickets, plus taxes and surcharges at $389, for a total of $759. Normally it would cost around $1000 or more. Quite a steal, I would say. All prices in this post (in the whole of this blog as well, unless otherwise stated) are in SGD.

Alternatively, some of the budget airlines provide cheaper means of flying to Japan. Do look out for special promotions, which could mean cheaper deals to bring you to the land of the rising sun!

Accommodation

The deciding factor greatly varies with the number of people sharing the room, as well as the places you wish to visit, and of course, your budget. Other things to consider when choosing a hotel are the facilities and services it provides, such as free Wi-fi in the room or only Wi-fi at the lobby area, or paid Wi-fi etc, in-door onsens (hotsprings), or close proximity to convenience stores, local subway stations or places of interest, any free or paid shuttle services to places of interest, airport transfers etc. With so many factors to consider, choose the most important features that you need from a hotel of your choice and within your budget.

We made all our bookings from Agoda.com. Most importantly why we chose Agoda was because of the various promotions they have with some of the hotels listed, as well as the user-friendly interface.

Next, based on our list of places which we want to visit, we then chose the hotels which are the most convenient. You wouldn't want to have to travel a long distance back to the hotel after a long day at the theme park or lugging huge shopping bags on your way back, would you? Therefore our choice of hotels is closely dependent on the places we want to visit.

Accommodation at Tokyo

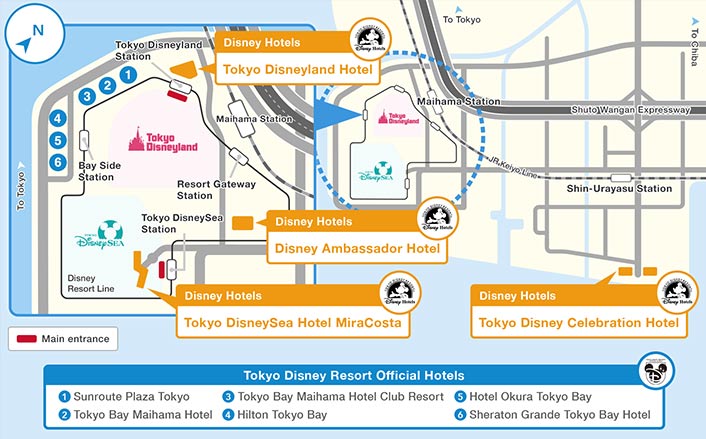
We had planned to go to Tokyo Disneyland or Tokyo DisneySea, therefore it's definitely a good idea to choose a hotel close to it. We decided to choose Sheraton Grande Tokyo Bay Hotel. It is a 5-star hotel and takes less than 10-minutes of monorail ride on the Disney Resort Line, which is a railway that only serves four stations around the whole Tokyo Disney Resort, to reach Disneyland or DisneySea. There are other hotels to choose from as well, and prices are pretty similar, so it's really up to your liking and room availability. One other benefit of choosing those hotels near Tokyo Disney Resort is the cheaper rates compared to those in the main Tokyo city areas such as Shibuya, etc. Do a comparison yourself. It's definitely a good idea to choose any of the three Disney-branded hotels or the six official hotels (Sheraton Grande Tokyo Bay Hotel being one of them) if you wish to spend a day or two at the resort.

Another thing you don't have to worry is that even though Sheraton Grande is not listed as a Disney-branded hotel, you will still be able to see plenty of Disney-related decorations, shops etc. in the hotel. I have not been to the other hotels but I believe they will also include Disney-related stuff in the hotel one way or another.


For a list of the hotels available for booking in Tokyo, click here.

To make a hotel booking at any of the three Disney-branded hotels,
visit the respective Disney hotel sites:

To make a hotel booking at the some of the other non-Disney hotels near Tokyo Disney Resort via Agoda.com, click the following links:

Accommodation at Shinjuku

There are plenty of hotels to choose from at Shinjuku area, so why did we choose Shinjuku Washington Hotel? Most of our choices depend on whether there were rooms for 3 pax, since I was travelling with my dear and her sis. Therefore all the hotels we chose had rooms for 3 pax. Besides that, the reason this hotel was chosen was because of its close proximity to Shinjuku Station, where many railway lines were available. Something we realized after we reached Shinjuku Station and trying to find our way to the hotel was that there actually is an underground walkway which links all the way to the hotel. No worries about rain or shine. The only drawback is it's quite a long walk to the hotel from the station, while pulling our luggage along. But it's definitely easier than pulling across streets or pavements, just that there's nothing to see along the way.

To make a hotel booking at Shinjuku Washington Hotel, click here.


Accommodation at Hakone

There are plenty of hotels to choose from. But we chose Hakone Hotel for it being conveniently located right next to the Hakonemachi Port, which is one of three ports to board the Hakone Sightseeing Cruise. We had planned to get the Hakone Freepass which allows one to travel around Hakone using the various transportation services available in the area. More on that later.

To make a hotel booking at Hakone Hotel, click here.


Accommodation at Osaka

For the last hotel in our 8-day trip, we chose Swissotel Nankai Osaka. There are other cheaper hotels in the area but are quite far from the subway station. It was our most expensive hotel for the whole trip, but I believe it was a really good choice because it sort of sits right on top of the Osaka Nanba station. Well worth the money for the convenience. It is also in the same building as Osaka Takashimaya, and all around you are shopping malls, banks etc. I would choose this hotel again if I have the budget simply because of the convenience if you wish to travel to other parts of Osaka. There is also Nankai Railway's very relaxing and comfortable Limited Express Rapi:t which is literally at the doorstep of the hotel, which takes us to Kansai International Airport in about 38 minutes. More on that later in my posts.

To make a hotel booking at Swissotel Nankai Osaka Hotel, click here.


Transportation

There are tonnes of day passes, discount passes for all types of transportation services in Japan. Especially if you're a local, these passes save you tonnes of money. For tourists like us, there are also many such passes which we can utilize to save on our transportation expenses.

For our itinerary, there was no need to get any advance tickets as all the tickets were conveniently available on our day of travel.

From my initial research for the transportation passes we may need to get, here are some of them which are useful:


For starters, if you plan to travel a lot along the JR lines via Shinkansen, it's a must that you buy the pass in advance in your own country. Due to our itinerary, we will not be traveling much on the Shinkansens and therefore we did not get the pass. Only choose to get the JR Pass if you plan to utilize it more than enough to cover the cost of the pass itself.


Tokyo Combination Ticket (¥1580 > ¥1600 for adults, ¥800 for children - prices as of April 2023)

This ticket allows unlimited rides on all lines of Tokyo Metro, Toei Subway, Toden, Tokyo metropolitan buses (except for buses with fixed seats, etc.), all sections of Nippori/Toneri Liners, as well as all lines of JR within Tokyo ward for one day stated in valid period.

Check out the various tickets available in the same page as well, according to your itinerary.


Yurikamome (Adults ¥800 > ¥820, Children ¥400 > ¥410 - prices as of April 2023)

This ticket allows traveling around the various attractions within the Odaiba area.


Hakone Freepass (From Shinjuku ¥5000 > ¥6100 for adults, ¥1100 for children - prices as of April 2023)

This ticket is definitely a must-buy if you wish to visit Hakone. Especially so if you're traveling from outside Hakone like Shinjuku, Machida or Odawara. This is because you will most probably want to embark on a trip around the whole of the Hakone area via the various transportation services available, which includes the following:

1. Hakone Tozan Train
2. Hakone Tozan Cable Car
3. Hakone Ropeway
4. Hakone Sightseeing Cruise
5. Hakone Tozan Bus / "KANKO SHISETSU-MEGURI"Bus (Tourist-facilities Round Bus)
6. Odakyu Hakone Highway Bus (Designated Areas)
7. Numazu Tozan Tokai Bus (Designated Areas)
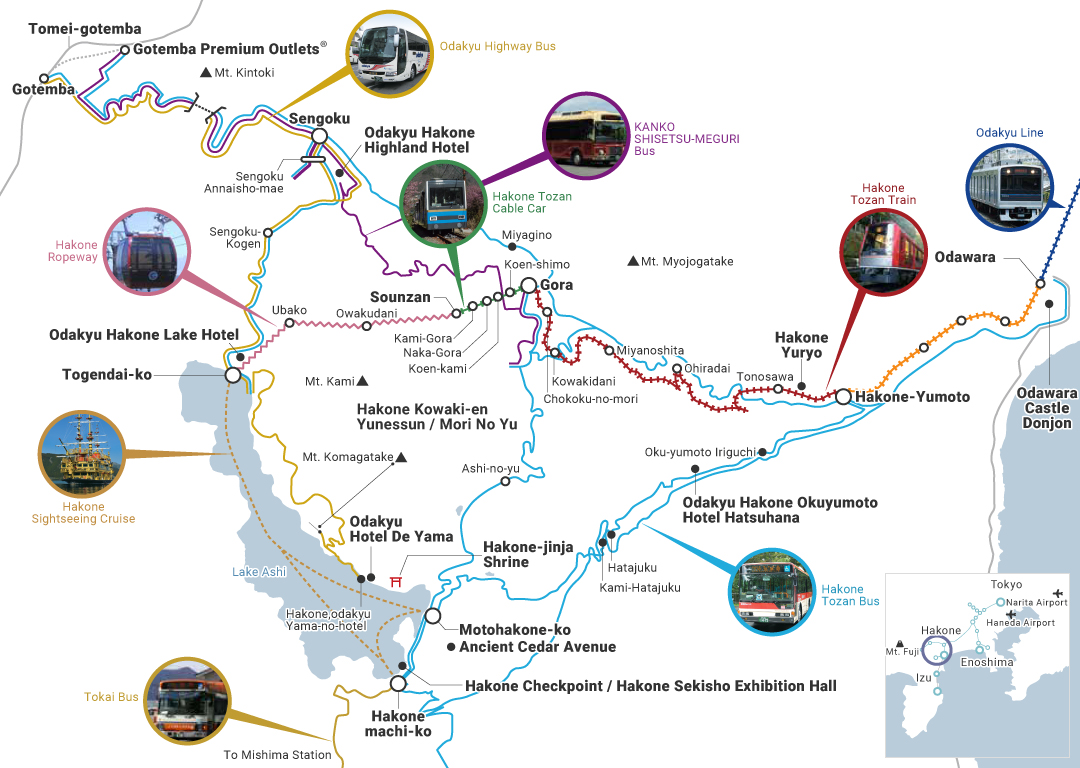

I can't stress enough on the benefits of getting this pass. Unless of course you wish to take the sightseeing cruise only, or you're not intending to ascend the various mountains to visit the various tourist attractions, onsens etc.


Planning Transportation Around Japan

Planning a trip around Japan is an easy process thanks to their wonderful transport system and readily available travel schedules of every single train, bus, ferry etc. The following two very useful tools helped me greatly in planning my itinerary, making sure I won't get lost when I am physically in Japan. (Then again, we did get kinda lost due to the overwhelming amount of information available everywhere we went.)

Hyperdia

This website is definitely the must-go if you want to have an accurate and easy time planning any trips around Japan. I planned all my routes and transportation using this website.

Google Maps

Besides Hyperdia, Google Maps played an important role of allowing me to plan which routes are close to which hotels, which hotels are closest to train stations and tourist attractions etc.


Mobile Wi-Fi (MiFi)

What could be more convenient than having a portable Wi-Fi wherever you go, during an overseas trip? After making some comparisons, we have chosen the service of Japan Wireless, getting the 42Mbps Mifi for 8 days (¥5200) plus shipping (¥500), all tax included. This comes up to about $75 for 8 days, which is less than $10 a day. It also comes with free spare battery. You can opt for additional insurance of ¥500. There are also the 21Mbps and 75Mbps versions. There are other such service providers available but we have decided to choose this for its lower prices, and excellent coverage (98% on e-mobile network, according to their website). I would say I could not remember a time not having any coverage. How it works is really simple, just follow the 7 steps shown on their main page.

It's really convenient to have internet access on our smart phones as we can then check for information on directions, tourist attractions, transportation etc. Good for video-calling with our families as well. I would suggest getting it because you'll never know when you need to search for something on the internet. This small device that fits snugly into your pockets will surely come in handy.

Other Resources

There are many websites that provide tonnes of information to prepare for a safe and easy trip in Japan. These are the few that I find pretty useful.

http://www.japan-guide.com/
http://www.japantravelinfo.com/top/index.php
http://www.japan-talk.com/jt/new/101-things-to-do-in-tokyo


Conclusion

An ill-planned itinerary will bring in unforeseen circumstances you would not wish to happen. Therefore, plan your itinerary ahead so that you don't have to worry about where and when to find the next train or how to get from point A to point B, or miss out on deals and save on your travel expenses.

I'm sure I might not have the best itinerary planned. There could be better deals out there which I might not have come across during my research and preparations for the trip. Readers, please drop some comments to share with me and all other readers if you find something more useful. I'm definitely going back to Japan again!

Finally, if you find this post useful, do share it with your family and friends. =)

Links to my Japan Trip 2013

Sunday, June 2, 2013

Travel Blog: Japan Trip 2013 Day 1 - Odaiba, 日本之旅第一天 - 御台場, 2 Jun 13

日本之旅第一天:6月2日2013年, 星期天 - 御台場
Japan Trip Day 1: 2 June 2013, Sunday - Odaiba
日本の旅行第一日:6月2日2013年(日曜日) - お台場

Day 1 of our 2013 Japan Trip officially started after the clock struck 12 while we were on the plane. It should still be in Singapore timezone. Japan is one hour earlier than Singapore in terms of timezone difference. I can never sleep well during midnight flights. I think I probably watched movies until 12am plus, when we were served our meals.

Our supper, at 12:30am.

Then we tried to sleep... But we were treated to breakfast in less than 4 hours after our supper lol. Some bread and muffin and fruits. By the time we finished breakfast at around 4:30am, the sky was getting brighter, and look what we found?!? Mount Fuji in sight!

Mt. Fuji like you've never seen before.

It was a breath-taking moment as the awesome view of Mount Fuji appeared right before our eyes. Never would we have thought to witness the splendour and gracefulness of Mt. Fuji as our first item on our list of must-sees, on the plane itself! Truly wonderful sight. Dear and Nut were pretty excited as well. It was my second time seeing Mt. Fuji up-close, but never on a plane. Awesome!
 
After touching down and on our way to collect our luggages.

After we have safely landed on the tarmac of Haneda Airport, I could see Dear and Nut so excited to finally be in Japan. We hurried off to collect our luggage and as soon as we stepped out of the arrival hall, the rows of service counters to purchase our bus tickets to our first hotel was right in front of us.

Various services conveniently available at these counters.
 
Our first tickets purchased in Japan. Airport limousine to our first hotel.

I then approached the friendly counter staff to purchase our airport limousine tickets to our first hotel, Sheraton Hotel. It costs 810 yen per person. As we still had about an hour to go before the bus arrives, we decided to explore around the airport. It was still early in the morning and hence the retail shops were not opened yet.

Dear and Nut fascinated by this huge information panel.
You can even take selfies and send it to yourself.

There's a small Japanese-themed area containing shops selling all sorts of stuff.

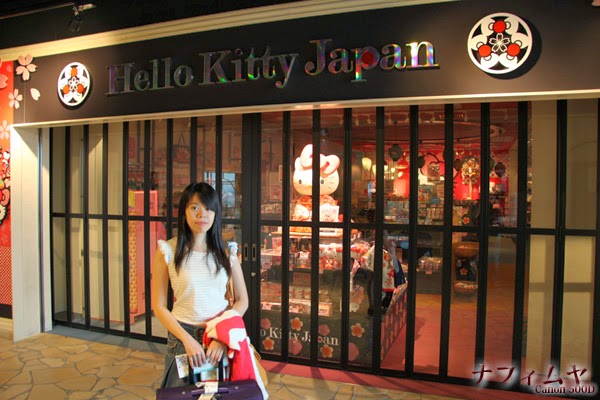
Dear couldn't resist taking a pic with the Hello Kitty shop, even when it's not yet opened.

Then we went out in the open to breathe in the fresh Japanese air. It was quite cold but that didn't stop us from venturing outside lol. I suggested taking jump shots. And after numerous attempts, and getting us all exhausted, we managed to grab a good shot of all three of us in the air.

We went out in the open. The weather was so cool. Probably 20 degrees or so.

And we tried doing jump shots. Finally got a good shot after numerous attempts.

After our exploration of the airport, it was time to catch our airport limousine service to our hotel. The bus was pretty comfortable and not crowded at all. It stopped at Disney Ambassador Hotel to let some occupants of that hotel to alight. We also got a chance to have a preview of Tokyo Disneyland as our bus drove past it.

Waiting for our bus to our hotel.

Our bus is here! All the way to Tokyo Disney Resort.

Saw some weird-looking shrubs or trees along the way.

The Disney Ambassador Hotel was along our way to our hotel.

First thing we did when we reached our hotel, Sheraton Grande Tokyo Bay Hotel, was to check in of course. Nut also made a phone call to Liezel, her friend who was staying in Tokyo for studies, to arrange a time for us to meet her later in the day. I also tried to ask the counter staff to check whether they have received the Mifi from Japan Wireless that I had ordered to be sent to the hotel. After much explanation to the staff, she finally understood what I was describing and managed to retrieve my package.Woohoo! Internet on the go! Never tried using such a device. But it was came in handy for us to check our routes and search for information. The whole package includes the Mifi device, as well as a pouch, a spare battery, a charger, and a return package to place all these items to be mailed back to Japan Wireless, all sealed in a plastic package. It also came with instructions on how to use the Mifi and how to return it to them on our last day of travel.

Nice parcel containing our Mifi waiting for us at the hotel.

The contents of the parcel.

The Mifi could connect up to 5 or probably more. Had no problem for all 3 of us, including Liezel later on, which makes it 4, to connect to the Mifi. After we were done checking in and had left our luggages with the hotel staff who then helped us to move them to our rooms, we set off on our itinerary's first place to visit, Odaiba!

The nearest train station for the Disney Resort Line from our hotel is Bayside Station. It's just a short 2-minute walk across the road. We bought our first train tickets of our Japan trip for this short journey to Resort Gateway Station. The whole of Tokyo Disney Resort, which comprises of Tokyo Disneyland and Tokyo DisneySea, is served by these four train stations of the Disney Resort Line. Therefore to go from one place to another around the resort, one would simply hop onto the trains on any of these four stations. The railways are only one-directional. Therefore, as can be seen on the map, if we wanted to go to Tokyo Disneyland Station from Bayside Station, we would have to go past the other two stations as well. One round around the whole circuit takes approximately 13 minutes. Every trip on the train, regardless or where you alight or board, costs 250 yen.


Our first tickets for Japanese trains.

As we waited for our train to arrive, the friendly staff would welcome everyone and tell us that the train was arriving shortly, and then waved to us as we hopped onto the train. The trains were all Disney-themed. The windows, ceiling, walls, even the handles. As we traveled along the resort, we could see the various parts of the two theme parks. The place was just so huge. We couldn't wait to visit DisneySea the next day lol.

The whole train is Disney-themed. Just look at the windows.

Can we bring one home?

Seems like they don't wish to alight.

Plenty of merchandise on display on the train.

Upon reaching the Resort Gateway Station, we cut through the Ikspiari, where the station was located, and walked over to the Maihama Station of the Keiyo Line. There, we bought tickets to Shin-kiba Station, which cost 150 yen each.

Tickets for the ride from Maihama to Shin-kiba.

Normal trains you see on the Keiyo Line.

Once we reached Shin-kiba Station, we had to purchase another ticket to reach Tokyo Teleport Station of the Rinkai Line, which costs 260 yen. That's a total of 660 yen just to reach Odaiba from Tokyo Disney Resort! Slightly more than S$8!

Every ticket has a serial number, and tickets of every line look rather different.
 
We saw this poster saying adults have discount of 5500 yen instead of the normal 6200 yen!
But it's only meant for locals. Tourists do not enjoy such discounts! T_T

Couldn't resist getting something good from these vending machines.

Chose green tea and red bean ice-cream.

Upon stepping out of Tokyo Teleport Station,we were surrounded by huge structures. There is the DiverCity Tokyo Plaza, Decks Tokyo Beach, a huge ferris wheel, Fuji TV building and many more. Our first objective was to find Liezel! She had been waiting for us for more than an hour from the last time Nut made contact with her at our hotel. She was waiting for us at Odaiba-kaihinkoen Station of another subway line. Therefore we had to cross the streets and walk over to that station from Tokyo Teleport Station. And there she was, standing right outside the station. Sorry Liezel!

DiverCity Tokyo Plaza

Decks Tokyo Beach

We then walked towards the shopping malls area along the coastline of Tokyo Port where Decks Odaiba and Aqua City Odaiba were located. These two shopping malls are pretty huge and contains several floors of entertainment, restaurants and shopping. The outdoor area overlooks the Tokyo Port area and the Rainbow Bridge. There's also a preview of the trick art museum.

A preview of the trick art museum

Welcome to Aqua City Odaiba!

Nice view of the Rainbow Bridge.

Wonder whether these two polar bears are the mascots of Aqua City or something.

Saw a Capcom retail shop selling all kinds of Capcom merchandise. Almost wanted to buy a Megaman T-shirt lol. There was also a Capcom promotional event going on at the atrium. Took a few pictures before I realized that photography is prohibited, after I saw some staff holding signs showing that cameras were not allowed lol. No excuse even if you're not Japanese cos they used symbols instead of words.

Capcom retail store!

There's a Capcom promotional event in the atrium area.

A life-sized figure of Phoenix Wright, a character in the Capcom game Ace Attorney.

A pirate-themed restaurant.

It's time to finally have a decent meal on our first day in Japan! We decided to try out the ramen at the Gotochi Menmatsuri, literally Local Noodle Festival, at Aqua City 5th floor. It's an area containing several ramen stalls and a gyoza stall. We all tried different ramen from different stalls. The ramen were pretty good and prices range from 800+ to 1000 yen. After we'd had our fill, the chemical reactions of the food with our stomach acids made us feel lethargic. And of course after all the traveling, all of us were pretty exhausted by then. So we decided to take a breather at the Starbucks nearby and ordered some drinks.

The entrance to the Local Noodle Festival.

Some tonkotsu and egg ramen.

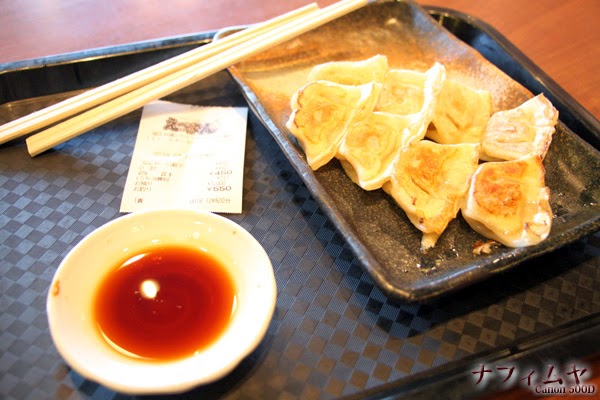
Some bite-sized gyoza.

Another tonkotsu ramen from another stall.

This comes with butter and corn.

Tsukemen, ramen that you eat by dipping the noodles into the gravy.

Some normal-sized gyoza.

Some thirst-quenching tea and a much desired break at Starbucks.

After the break, we ventured outdoors to check out the beach area. There was this replica of the Statue of Liberty right outside Aqua City, with the Tokyo Bay and the Rainbow Bridge in the background. Along the beach was the Odaiba Pier where you can board the Water Bus and cruise along the waters along Tokyo Bay. We strolled along the seaside park where locals happily walked their dogs. Plenty of tourists and locals also lined the paths enjoying the cool breeze and wonderful scenery. Even though the wind was cold, the sun was actually scorching hot. Certainly not good for our skin and health.


A replica of the Statue of Liberty and the Rainbow Bridge in the background.

A close up of the Statue of Liberty. Looks like the real thing eh?

The Odaiba Pier for the Water Bus ride.

We took a picture with The Fuji TV Building, the back of the Statue of Liberty and some giant anchors.

The futuristic-looking Fuji TV features some light shows at night on its exterior.

Locals walking their dogs along the park. How relaxing.

Many people gathering at the beach area.

Decks Tokyo Beach. The distinctive colourful decks that face the beach area.

We then ventured back indoors to Decks and explored around the shopping mall. There were really many attractions within Decks itself, such as the Legoland Discovery Centre, Madame Tussauds Wax Museum, Tokyo Joypolis and so on. We wondered into the shopping area Odaiba 1-Chome Shopping Street. It is sort of like a theme park or funfair, with various mini attractions and shopping streets, which are all indoors. We played some air rifle games, ate some takoyaki at the Takoyaki Museum. There were a few stalls to choose from so we randomly chose one of the stalls to try out its takoyaki.

The Sega Joypolis inside Decks. Look at the crowd.

Odaiba 1-Chome Shopping Street inside Decks.

The Takoyaki Museum inside Decks.

Some haunted house for you?

Endless shopping.

Not enough of shooting during NS? Yea so decided to try out this air rifle game.

Takoyaki! Oishii!

After the snack, we finally went to the Trick Art Museum. Tickets are at 900 yen for adults and 600 for children. Free for 3 years old and below. There were several trick art pieces outside the museum itself for a preview. The following pictures were all taken outside the museum. Yes, you could see them for free.

Looks real doesn't it? Everything except Momo dear and the signage is painted. LOL

A trick art piece placed outside the museum. Can you find 5 animals in this picture?
Hint: Panther, rhinoceros, gorilla, elephant and giraffe.

 Momo dear disturbing two geishas.


Beautiful designs on each ticket.

Spoiler Alert: I have created a separate post for most of the trick art pieces in the museum itself.
Don't click if you wish to go there and see it for yourself some day.

Go to my dedicated post on the Trick Art Museum.

We spent about an hour inside the museum taking pictures of the fascinating trick art pieces. By then we were all so spent that all we wanted were to sit down somewhere and rest. That was when I decided to take a pee break in the nearest toilet. To my amazement, there was this toilet peeing game. I HAD to show them what it looked like. Therefore I went back in again to take a video of the whole process. (not of myself peeing of course!) Then I showed them the video. I doubt there's such a thing in the female toilet lol.


After the amusement from peeing, we went out to the open area to see the evening sky of Odaiba. The view was simply gorgeous. The multi-coloured ships had lighted up with their corresponding colours, and it seemed like they were intentionally parked evenly apart from each other in the waters. We spent almost half an hour taking pictures and admiring the view from the upper decks of Decks. The weather was getting colder by the minute as the sun disappeared behind the buildings in the distance. The next target was of course...dinner!

Where can you get such sights in Singapore?

Did a HDR version.

We walked over to DiverCity Tokyo Plaza to get dinner. Along the way we saw the ferris wheel in all its glory as it sparkled against the night sky. It was getting really cold by then and we rushed over to DiverCity to get some warmth.

Beautiful ferris wheel.

Saw this flyer at one of the information booths in the mall.

Saw a shop selling all kinds of anime related stuff. Bought myself a One Piece souvenir! It's actually a metal container shaped like a barrel, and in it contains some biscuits. Decided to buy another one for a friend of mine who is a big fan of One Piece. I'm sure he'll love it. You can see what it is in the souvenirs post.

We went around choosing a good restaurant for dinner and ended up at this Premium Kaiou sushi restaurant. What's unique about this sushi restaurant is that it doesn't just come with a conveyor belt, but you can also order and get your sushi delivered right to your table via a toy shinkansen! Definitely provides some amusement and fun for the kids and even adults.

Our sushi arrived on this toy shinkansen!

They have many interesting sushi not found elsewhere.

Looks damn good doesn't it?


The meal cost the four of us about 3400 yen, which is about $10 each! That's considered quite cheap for a conveyor belt sushi restaurant. What's more, you get to play with toy shinkansens! Good bargain!

The signboard even features the outline of a shinkansen.


And after the awesome sushi meal, we explored the other levels of this huge shopping mall. It was pretty late already and therefore most of the shops were closing. There is this Gundam-style cafe located at the top floor, called Gundam Front. Too bad it was closed by the time we were there.

Too bad it was already closed...

Nevertheless, what awaited us was the ultimate treat. It was the life-sized Gundam right in front of us as we exited DiverCity through the food court at the first floor. You can see the lights shining onto its armour, showing its intricate details. The eyes were glowing as well. Only in Japan can you find such a structure, based on an anime which is so popular that they actually erected such a monstrousity right in the middle of a man-made island.

This is every Gundam fan's dream sight.

Look at all the little details.

Even a non-Gundam fan would be awed by this majestic masterpiece.

After getting wow-ed by the gigantic robot, we decided to head home, but not before admiring the beauty of the night lights of Odaiba. The view was simply breath-taking. Our hearts wanted to stay but our bodies were exhausted from the whole day of activities. We took the same trains that we took in the morning back to our hotel, which consists of three trains and at a cost of 560 yen each.

Took some night shots of the Rainbow Bridge.
And in front of it, a passing train on its railway can be seen on the right.

Night view of Rainbow Bridge and the replica of the Statue of Liberty.

Tickets to get back to Sheraton Hotel.

And the final surprise for the day had to be the cute decoration in our hotel room. The hotel staff had brought our luggage into our rooms earlier on in the day so it was the first time we had a glimpse of our hotel room. It sure would brighten up any kid's day the moment they step into the room, which consists of wallpapers of dolphins, clocks with whales, and even a coffee table made of children's playing alphabet blocks. What a great way to end the first day of our tour of Japan.

Cute dolphin wallpaper for the kids.

Kimono bathrobes

And a cute clock to go with the theme.

Looks really comfy. Sure brings sweet dreams sleeping in such a room.

Felt like being in a kindergarten.

To make a hotel booking at Sheraton Grande Tokyo Bay Hotel, click here.

To make a hotel booking at the some of the other non-Disney hotels near Tokyo Disney Resort via Agoda.com, click the following links:
Links to my Japan Trip 2013