I have decided to include this post because it takes a tremendous amount of time to plan and prepare for a free-and-easy trip, and precisely why it takes so long is because of how readily available the information is, especially for a country like Japan, where they have done an exceptional job of marketing themselves. So much information is available online that it's really good to know what you're gonna get, before plunging straight into the trip and then realizing that you could have had more information at hand to prevent certain unexpected things from happening. Also, we had spent about one month's time to gather information, book all the necessary accommodation, air tickets, planning, which trains and routes to take throughout our 8 days in Japan. Therefore I felt that we should share our experiences which could potentially help other travelers have an easier time planning a trip to Japan.
Air Tickets
This is more for Singaporeans. We got our tickets from Chan Brothers Travel, which had a promotion for the non-stop return tickets to Japan with Singapore Airlines Airbus 330-300. It was $370 for the tickets, plus taxes and surcharges at $389, for a total of $759. Normally it would cost around $1000 or more. Quite a steal, I would say. All prices in this post (in the whole of this blog as well, unless otherwise stated) are in SGD.
Alternatively, some of the budget airlines provide cheaper means of flying to Japan. Do look out for special promotions, which could mean cheaper deals to bring you to the land of the rising sun!
Alternatively, some of the budget airlines provide cheaper means of flying to Japan. Do look out for special promotions, which could mean cheaper deals to bring you to the land of the rising sun!
Accommodation
The deciding factor greatly varies with the number of people sharing the room, as well as the places you wish to visit, and of course, your budget. Other things to consider when choosing a hotel are the facilities and services it provides, such as free Wi-fi in the room or only Wi-fi at the lobby area, or paid Wi-fi etc, in-door onsens (hotsprings), or close proximity to convenience stores, local subway stations or places of interest, any free or paid shuttle services to places of interest, airport transfers etc. With so many factors to consider, choose the most important features that you need from a hotel of your choice and within your budget.
We made all our bookings from Agoda.com. Most importantly why we chose Agoda was because of the various promotions they have with some of the hotels listed, as well as the user-friendly interface.
Next, based on our list of places which we want to visit, we then chose the hotels which are the most convenient. You wouldn't want to have to travel a long distance back to the hotel after a long day at the theme park or lugging huge shopping bags on your way back, would you? Therefore our choice of hotels is closely dependent on the places we want to visit.
Accommodation at Tokyo
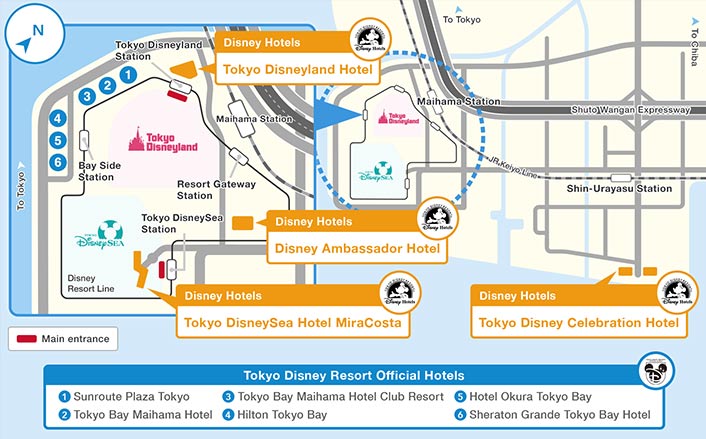
We had planned to go to Tokyo Disneyland or Tokyo DisneySea, therefore it's definitely a good idea to choose a hotel close to it. We decided to choose Sheraton Grande Tokyo Bay Hotel. It is a 5-star hotel and takes less than 10-minutes of monorail ride on the Disney Resort Line, which is a railway that only serves four stations around the whole Tokyo Disney Resort, to reach Disneyland or DisneySea. There are other hotels to choose from as well, and prices are pretty similar, so it's really up to your liking and room availability. One other benefit of choosing those hotels near Tokyo Disney Resort is the cheaper rates compared to those in the main Tokyo city areas such as Shibuya, etc. Do a comparison yourself. It's definitely a good idea to choose any of the three Disney-branded hotels or the six official hotels (Sheraton Grande Tokyo Bay Hotel being one of them) if you wish to spend a day or two at the resort.
Another thing you don't have to worry is that even though Sheraton Grande is not listed as a Disney-branded hotel, you will still be able to see plenty of Disney-related decorations, shops etc. in the hotel. I have not been to the other hotels but I believe they will also include Disney-related stuff in the hotel one way or another.
For a list of the hotels available for booking in Tokyo, click here.
To make a hotel booking at any of the three Disney-branded hotels,
visit the respective Disney hotel sites:
To make a hotel booking at the some of the other non-Disney hotels near Tokyo Disney Resort via Agoda.com, click the following links:
Accommodation at ShinjukuTo make a hotel booking at any of the three Disney-branded hotels,
visit the respective Disney hotel sites:
To make a hotel booking at the some of the other non-Disney hotels near Tokyo Disney Resort via Agoda.com, click the following links:
- Hilton Tokyo Bay
- Sheraton Grande Tokyo Bay Hotel (we chose this hotel)
- Sunroute Plaza Tokyo
- Tokyo Bay Maihama Hotel Club Resort
There are plenty of hotels to choose from at Shinjuku area, so why did we choose Shinjuku Washington Hotel? Most of our choices depend on whether there were rooms for 3 pax, since I was travelling with my dear and her sis. Therefore all the hotels we chose had rooms for 3 pax. Besides that, the reason this hotel was chosen was because of its close proximity to Shinjuku Station, where many railway lines were available. Something we realized after we reached Shinjuku Station and trying to find our way to the hotel was that there actually is an underground walkway which links all the way to the hotel. No worries about rain or shine. The only drawback is it's quite a long walk to the hotel from the station, while pulling our luggage along. But it's definitely easier than pulling across streets or pavements, just that there's nothing to see along the way.
Accommodation at Hakone
There are plenty of hotels to choose from. But we chose Hakone Hotel for it being conveniently located right next to the Hakonemachi Port, which is one of three ports to board the Hakone Sightseeing Cruise. We had planned to get the Hakone Freepass which allows one to travel around Hakone using the various transportation services available in the area. More on that later.
To make a hotel booking at Hakone Hotel, click here.
Accommodation at Osaka
For the last hotel in our 8-day trip, we chose Swissotel Nankai Osaka. There are other cheaper hotels in the area but are quite far from the subway station. It was our most expensive hotel for the whole trip, but I believe it was a really good choice because it sort of sits right on top of the Osaka Nanba station. Well worth the money for the convenience. It is also in the same building as Osaka Takashimaya, and all around you are shopping malls, banks etc. I would choose this hotel again if I have the budget simply because of the convenience if you wish to travel to other parts of Osaka. There is also Nankai Railway's very relaxing and comfortable Limited Express Rapi:t which is literally at the doorstep of the hotel, which takes us to Kansai International Airport in about 38 minutes. More on that later in my posts.
To make a hotel booking at Swissotel Nankai Osaka Hotel, click here.
To make a hotel booking at Swissotel Nankai Osaka Hotel, click here.
Transportation
There are tonnes of day passes, discount passes for all types of transportation services in Japan. Especially if you're a local, these passes save you tonnes of money. For tourists like us, there are also many such passes which we can utilize to save on our transportation expenses.
For our itinerary, there was no need to get any advance
tickets as all the tickets were conveniently available on our day of
travel.
From my initial research for the transportation passes we may need to get, here are some of them which are useful:
For starters, if you plan to travel a lot along the JR lines via Shinkansen, it's a must that you buy the pass in advance in your own country. Due to our itinerary, we will not be traveling much on the Shinkansens and therefore we did not get the pass. Only choose to get the JR Pass if you plan to utilize it more than enough to cover the cost of the pass itself.
Tokyo Combination Ticket (¥1580 > ¥1600 for adults, ¥800 for children - prices as of April 2023)
This ticket allows unlimited rides on all lines of Tokyo Metro, Toei Subway, Toden, Tokyo metropolitan buses (except for buses with fixed seats, etc.), all sections of Nippori/Toneri Liners, as well as all lines of JR within Tokyo ward for one day stated in valid period.
Check out the various tickets available in the same page as well, according to your itinerary.
Yurikamome (Adults
This ticket allows traveling around the various attractions within the Odaiba area.
Hakone Freepass (From Shinjuku
This ticket is definitely a must-buy if you wish to visit Hakone. Especially so if you're traveling from outside Hakone like Shinjuku, Machida or Odawara. This is because you will most probably want to embark on a trip around the whole of the Hakone area via the various transportation services available, which includes the following:
1. Hakone Tozan Train
2. Hakone Tozan Cable Car
3. Hakone Ropeway
4. Hakone Sightseeing Cruise
5. Hakone Tozan Bus / "KANKO SHISETSU-MEGURI"Bus (Tourist-facilities Round Bus)
6. Odakyu Hakone Highway Bus (Designated Areas)
7. Numazu Tozan Tokai Bus (Designated Areas)
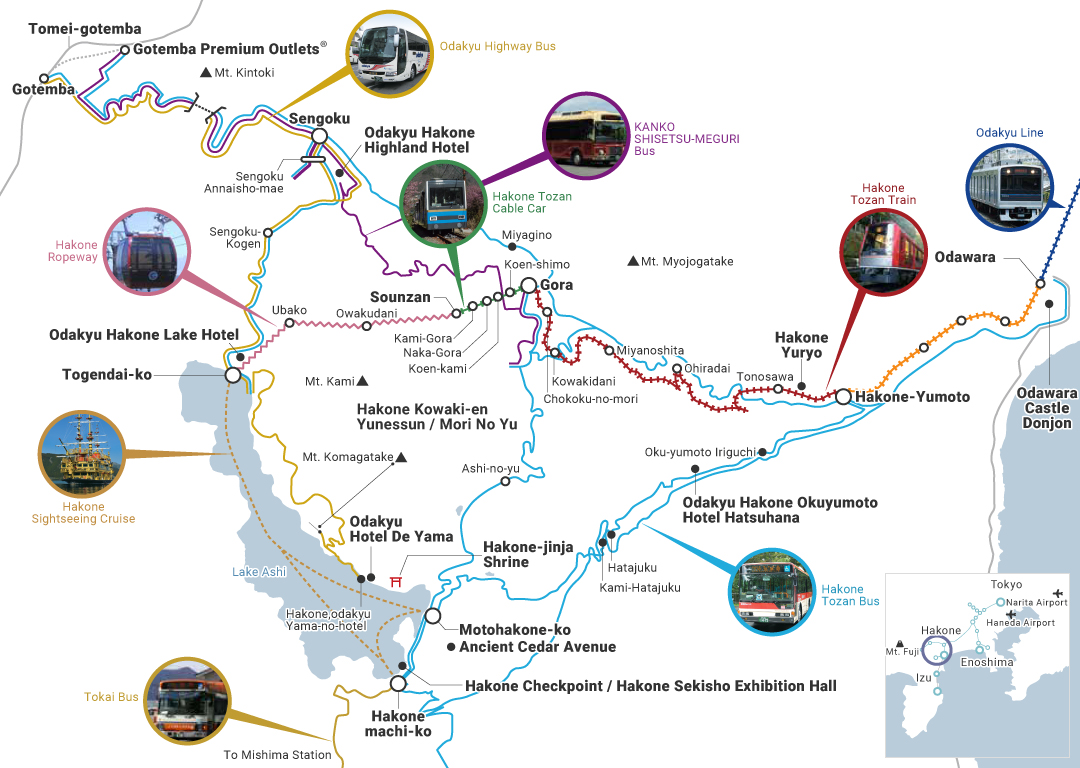
Taken from https://www.odakyu.jp/english/passes/hakone/
I can't stress enough on the benefits of getting this pass. Unless of course you wish to take the sightseeing cruise only, or you're not intending to ascend the various mountains to visit the various tourist attractions, onsens etc.
Planning Transportation Around Japan
Planning a trip around Japan is an easy process thanks to their wonderful transport system and readily available travel schedules of every single train, bus, ferry etc. The following two very useful tools helped me greatly in planning my itinerary, making sure I won't get lost when I am physically in Japan. (Then again, we did get kinda lost due to the overwhelming amount of information available everywhere we went.)
Hyperdia
This website is definitely the must-go if you want to have an accurate and easy time planning any trips around Japan. I planned all my routes and transportation using this website.
Google Maps
Besides Hyperdia, Google Maps played an important role of allowing me to plan which routes are close to which hotels, which hotels are closest to train stations and tourist attractions etc.
Mobile Wi-Fi (MiFi)
What could be more convenient than having a portable Wi-Fi wherever you go, during an overseas trip? After making some comparisons, we have chosen the service of Japan Wireless, getting the 42Mbps Mifi for 8 days (¥5200) plus shipping (¥500), all tax included. This comes up to about $75 for 8 days, which is less than $10 a day. It also comes with free spare battery. You can opt for additional insurance of ¥500. There are also the 21Mbps and 75Mbps versions. There are other such service providers available but we have decided to choose this for its lower prices, and excellent coverage (98% on e-mobile network, according to their website). I would say I could not remember a time not having any coverage. How it works is really simple, just follow the 7 steps shown on their main page.
It's really convenient to have internet access on our smart phones as we can then check for information on directions, tourist attractions, transportation etc. Good for video-calling with our families as well. I would suggest getting it because you'll never know when you need to search for something on the internet. This small device that fits snugly into your pockets will surely come in handy.
Other Resources
There are many websites that provide tonnes of information to prepare for a safe and easy trip in Japan. These are the few that I find pretty useful.
http://www.japan-guide.com/
http://www.japantravelinfo.com/top/index.php
http://www.japan-talk.com/jt/new/101-things-to-do-in-tokyo
Conclusion
An ill-planned itinerary will bring in unforeseen circumstances you would not wish to happen. Therefore, plan your itinerary ahead so that you don't have to worry about where and when to find the next train or how to get from point A to point B, or miss out on deals and save on your travel expenses.
I'm sure I might not have the best itinerary planned. There could be better deals out there which I might not have come across during my research and preparations for the trip. Readers, please drop some comments to share with me and all other readers if you find something more useful. I'm definitely going back to Japan again!
Finally, if you find this post useful, do share it with your family and friends. =)
Finally, if you find this post useful, do share it with your family and friends. =)
Links to my Japan Trip 2013